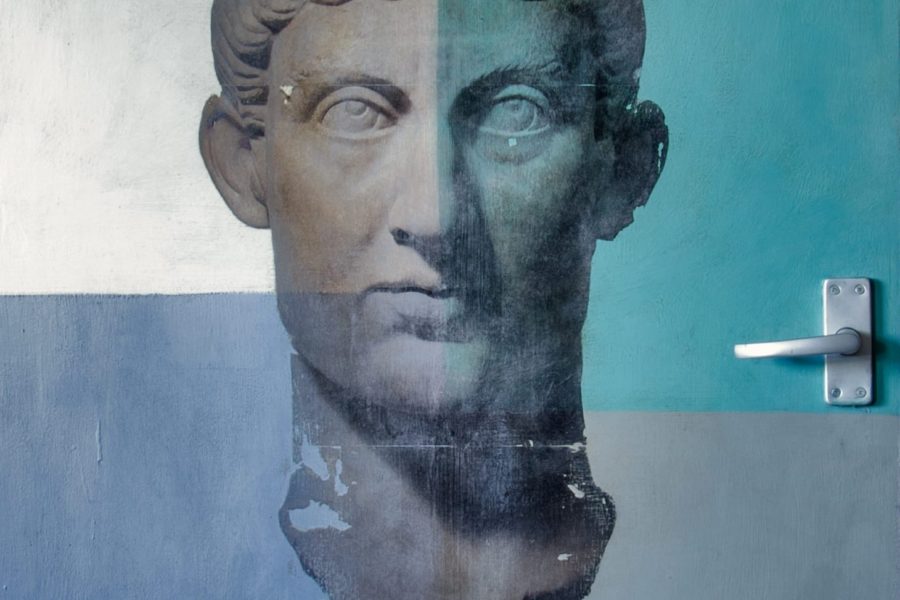
Image transfer is a versatile technique that you can use for a variety of different applications. You can transfer any image directly onto furniture, walls, fabric – here we’ve transferred an image onto a door at Annie Sloan HQ! Using Annie Sloan Image Medium, you can select any image to suit your style, whether graphic or floral, vintage or modern.
Image transfer refers to the process of transferring a printed image onto any surface. Despite appearances, this technique is incredibly simple to learn. You certainly don’t need to be an expert to achieve stunning results. Whether your an experienced furniture upcycler or a novice, the truth is you just need access to a printer to create this look!
Step by step guide to transferring an image
- Print your image using a laser printer or photocopy it onto normal printer paper. When choosing your image, bear in mind that it will transfer in reverse, so you may need to flip the image first before printing it out, especially if any text is included.
- Using sharp scissors, cut your image out, getting as close to the image outline as possible.
- Start with a surface that has been painted but not waxed (unless you’re transferring onto fabric, then just make sure it’s clean and crease free). Once the paint is completely dry, your image can be applied.
- Brush a thin layer of Annie Sloan Image Medium over the part of the surface you would like to transfer your image onto. Be careful not to make the area on which you are gluing much larger than the image, as the unused glue will leave a slightly sticky, shiny area when it is not covered by the picture.
- Being extremely careful, paint the image right side up with a very thin layer of Image Medium and, whilst it is still wet, slide it on to your surface face down. Make sure any air bubbles are worked out or even pricked with a pin as you don’t want these on your finished piece.
- Rub the image with a dry cloth, making sure it is totally stuck to the surface (don’t forget the edges!) and leave it to dry completely.
- Now wet the paper with a little water. Once it is damp but not soggy, start to rub it in little circular movements with either a cloth or your finger. The paper will start to come off in layers. At first, it may look a little cloudy – keep going!
- Once all the paper is off, the image will be clear, although it may look a little dull once it is dry so brush the whole thing over with clear Chalk Paint™ Wax. You can rough it up a little by gently sanding the edges, or leave it as a clean, crisp image.
Now you’re ready to try image transfer for yourself, you can have fun researching and choosing the right images for your project. You can find great inspiration in books and, of course, the internet. Wherever you search, make sure you select an image at a high enough resolution so your image looks nice and crisp when printed. Think about whether your image will work together with the paint colours you’ve chosen for your piece to create a cohesive look. For a fantastic antique effect, why not try Dark Chalk Paint™ Wax after you’ve applied Clear Wax? Finally, remember to support your local Annie Sloan Stockist by purchasing all the paint and materials you need for this technique through them.